

How To Repair Windows Xp Sp3 Using Recovery Console
This guide is virtually Recovery Console, the command-line tool available for the following Windows versions: Windows XP, Windows 2000, Windows Server 2003.
Contents
- 1 What is Recovery Panel
- ii Access Recovery Console
- two.1 If you lot have the installation CD
- 2.2 If you installed Recovery Console
- two.iii If you use Like shooting fish in a barrel Recovery Essentials
- 3 Install Recovery Console
- 4 Delete Recovery Console
- 5 Commands
- 6 Troubleshooting
- six.1 Password for Recovery Console
- 6.2 Recovery Console in Windows Vista or 7
- 7 More Information
- vii.1 Support Links
- 7.two Applicable Systems
What is Recovery Panel
Recovery Console is a control-line tool available merely for these versions of Windows: XP, 2000 and Server 2003.
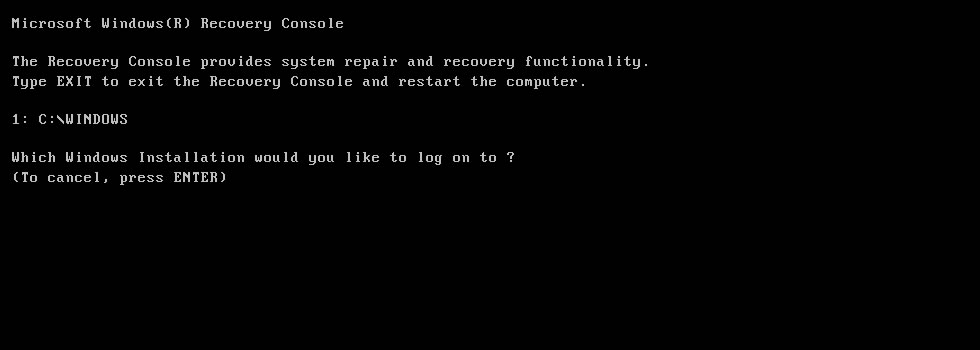
The tool loads with this bulletin:
Microsoft Windows(R) Recovery Panel The Recovery Console provides system repair and recovery functionality. Blazon Go out to exit the Recovery Console and restart the computer. i: C:\WINDOWS Which Windows Installation would you like to log on to ? (To cancel, press ENTER)
In the in a higher place example, Windows is installed on C:\. You need to blazon 1 and printing Enter to load the Windows bachelor on the C:\ bulldoze.
The command-line tool isn't available for Windows Vista, Windows 7, Windows 8 or Windows 8.1. It's only available for Windows XP and Server 2003, these two operating systems beingness the last versions of Windows to have it installed.
Windows Vista, 7 and eight replaced Recovery Console with System Recovery Options, a collection of recovery tools.
You can perform the post-obit with Recovery Panel:
- Dispense arrangement files (re-create, rename, supercede etc.)
- Enable or disable startup services (services that run automatically at boot)
- Repair the MBR (related: Gear up the MBR guide)
- Create and format partitions
- Run the chkdsk command
You tin can only use the Recovery Console as an Ambassador of the system or every bit whatsoever user role of the Administrator group.
You tin can access the tool from the original installation CD or from the kick menu if you already installed it on your figurer. Follow these instructions on how to install it and make information technology available at kick without a CD.
Access Recovery Console
To access the Recovery Console, you have the following options:
- Use the original Windows XP installation CD, if you lot still have it
- If you installed Recovery Console on your system, select it from the Startup Options card
- Use Piece of cake Recovery Essentials to admission Command Line and run Recovery Panel-specific commands
If you have the installation CD
If yous have the original Windows XP installation CD, follow these steps to access Recovery Console:
- Kicking your computer
- Insert the Windows XP CD
- Press any key at the Press whatever key to kick from CD message
- At the Welcome to Setup screen, press R:
To repair a Windows XP installation using Recovery Console, press R.
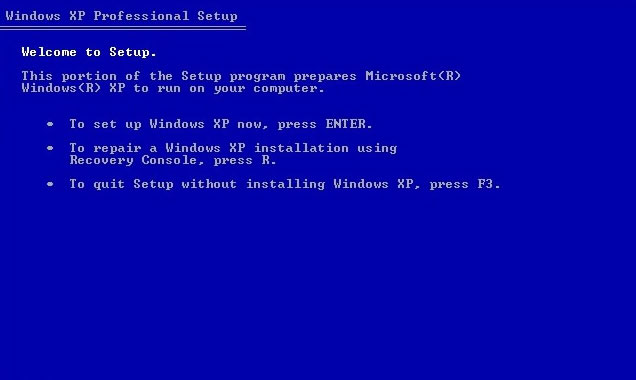
Windows XP Press R for Recovery Console
- The Windows XP CD volition now load Recovery Console:
Microsoft Windows(R) Recovery Console The Recovery Console provides system repair and recovery functionality. Type Go out to leave the Recovery Console and restart the computer. 1: C:\WINDOWS Which Windows Installation would you like to log on to ? (To cancel, press ENTER)
- Type
1and press Enter - Recovery Console is now loaded
If y'all installed Recovery Console
If you haven't installed the tool, follow these instructions.
If you already installed Recovery Console on your figurer, yous may access information technology at the Startup Options menu. To do so, follow these steps:
- Start your calculator
- Wait for your computer to kick into the Boot Options menu
- At the Please select the operating organisation to start: bulletin, select Microsoft Windows XP Recovery Console

- Press Enter
If yous utilise Piece of cake Recovery Essentials
If yous use Like shooting fish in a barrel Recovery Essentials, our repair and recovery deejay, you tin can access Command Line and run the commands you lot need:
- Download Easy Recovery Essentials
- Burn the ISO Paradigm. Follow our instructions on how to burn a bootable ISO paradigm. If yous'd like to have a recovery USB instead, follow our instructions on how to make a recovery USB.
- Boot Piece of cake Recovery Essentials from the CD, DVD or USB
- Select Launch Command Line

Install Recovery Console
You can install Recovery Console on your organization.
Before you exercise, read these notes:
- Y'all demand to take the Windows XP installation CD
- You demand to use the Windows XP installation CD, the CD that you used to install Windows XP on your estimator.
If you lot have Windows XP SP1 on the CD, y'all need to take Windows XP SP1 installed and not SP2 installed.
If you practise have SP2 installed, while your original CD is with SP1, read KB 898594.
To install Recovery Panel, follow these steps:
- Boot into Windows XP
- Insert the Windows XP CD in the disk drive
- Go to Start
- Go to Run
- Type the following control, just replace
east:with your calculator's optical bulldoze letter of the alphabet:east:\i386\winnt32.exe /cmdcons
- Press Enter
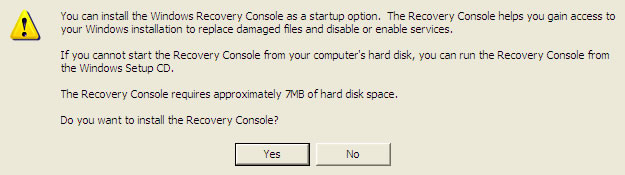
- Click Yes at the Windows Setup warning message
- Wait for the process to end
- Click OK at the The Windows Recovery Console has been successfully installed message
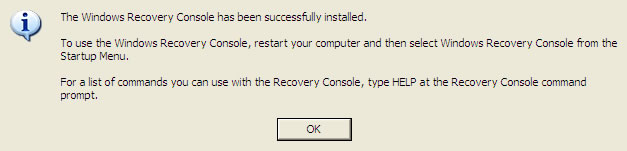
- After Recovery Console is installed, yous can restart your reckoner and see it at the boot options menu:
Delete Recovery Console
If you installed Recovery Console, you can also delete it from the kicking options menu.
To delete information technology, follow these steps:
- Restart your Windows XP system
- Click Outset
- Click My Computer
- Double-click on
C:\or the drive where Windows XP is installed - Click Tools, then Folder Options, and and so click the View tab
- Click Prove hidden files and folders and make sure Hide protected operating arrangement files is unchecked
- Click OK
- Delete the
Cmdconsbinder and theCmldrfile fromC:\ - Correct-click on the
Boot.inifile (warning: do non delete this file) and click Properties - Make sure the Read-only option is unchecked
- Click OK
- Open up the
Boot.inifile with Notepad - Remove the Recovery Panel line from the file. This line looks like this:
C:\cmdcons\bootsect.dat="Microsoft Windows Recovery Console" /cmdcons
- Salvage the
Boot.inifile
Commands
The following commands are available to use in Recovery Console:
-
attrib– changes the attributes of a binder -
batch– will run commands that are specified in a text file -
bootcfg– this control is for kicking configuration and recovery. For more information, meet the bootcfg guide -
cd– will alter to a different folder -
chdir– it's like tocdabove, information technology will alter to a unlike folder -
chkdsk– will check the specified drive and repair it, if needed. For more than information, meet the chkdsk guide -
cls– clear the command screen -
copy– copies a file to a specified destination -
del– deletes a file -
delete– similar todelabove, deletes a file -
dir– displays a list of files and folders from the current folder -
disable– disables a specified Windows service -
diskpart– manages partitions on the hd. For more information, see the diskpart guide -
enable– enables a specified Windows service. To disable a service, utilisedisable -
exit– exit Recovery Console -
aggrandize– expands a file -
fixboot– writes a new boot sector on the sectionalization -
fixmbr– repair the MBR of the boot partitioning. For more information, see the Fix MBR guide -
format– formats a specified bulldoze -
listsvc– lists all available services and drivers -
logon– lists all detected Windows installations -
map– list drive letters, types, segmentation sizes and mappings -
doctor– create a new folder -
mkdir– like tomd, creates a new folder -
more than– displays a text file to the screen -
rd– delete a binder -
rmdir– similar tord, deletes a folder -
ren– rename a file -
rename– similar toren, renames a file -
ready– displays and modifies environment options -
systemroot– fix the current binder to the %SystemRoot% folder of the current Windows installation -
type– displays a text file
Troubleshooting
Password for Recovery Console
Recovery Console will ask you for the Administrator password.
If you lot ordinarily log into Windows XP without a countersign, simply press Enter without typing any password to cheque if Recovery Panel would accept this.
If this method doesn't work, you'll need to know the Administrator password.
Another alternative is to boot into Windows XP and open the Registry Editor to set the DWORD SecurityLevel to 1. To exercise so, follow these steps:
- Boot into Windows XP
- Click Start
- Click Run
- Blazon
regedit - Click OK or printing Enter
- Navigate to this cardinal:
HKEY_LOCAL_MACHINE\SOFTWARE\Microsoft\WindowsNT\CurrentVersion\Setup\RecoveryConsole
- Set the value of
DWORD SecurityLeveltoone - Leave the Registry Editor
- Reboot your Windows XP system
Recovery Console in Windows Vista or 7
Recovery Console is not available on Windows Vista or Windows seven systems. Windows Vista, 7 and eight systems are using the Arrangement Recovery Options fix of tools instead of Recovery Panel that you can use to repair or restore your computer.
To boot into System Recovery Options on a Windows Vista, follow these steps:
- Boot from the installation CD/DVD
- At the "Press any key to boot from CD or DVD…" message, press whatever central to kick from the DVD
- Click Repair your computer

- Choose the operating organization from the list
- Organization Recovery Options is now available

To kick into System Recovery Options on a Windows seven, follow these steps:
- Kick from the Windows 7 installation DVD
- At the "Press any cardinal to boot from CD or DVD…" bulletin, printing whatsoever key to boot from the DVD
- At the Install Windows screen, select a linguistic communication, fourth dimension and keyboard
- Click Adjacent
- Click Repair your calculator or press R

- System Recovery Options is at present bachelor

More Data
Back up Links
- Easy Recovery Essentials for Windows – our repair and recovery disk.
It'due south an easy-to-use and automatic diagnostics disk. It'southward available for Windows viii, Windows seven and Windows Vista. It's also available for Windows XP and Windows Server.
Read more than at Windows Recovery Disks.
- The NeoSmart Back up Forums, member-to-member technical back up and troubleshooting.
- Become a discounted price on replacement setup and installation discs: Windows XP.
Applicable Systems
This Windows-related knowledgebase article applies to the following operating systems:
- Windows XP (all editions)
- Windows Server 2003 (all editions)
Propose an edit
Source: https://neosmart.net/wiki/recovery-console/
Posted by: jeremiahcamagirse.blogspot.com
0 Response to "How To Repair Windows Xp Sp3 Using Recovery Console"
Post a Comment